
Preparing a Room for Renovation: What You Need to Know
When it comes to renovating a room, preparation is key. To ensure your space looks its best and that the job is done correctly, follow these three steps when preparing the room for renovation. The first step in preparing a room for renovation is to clear out any furniture or objects from the space. Depending on how much work you plan on doing, you may want to completely empty out the room and store away any items that are not being used during the renovation process. This will give you plenty of space for working and allow contractors easy access to all areas of your home.
Next, you should remove any existing hardwood flooring before beginning your renovations. This can include rugs, hardwood floors, or tiles depending on what type of flooring was previously installed in the area. Removing this material can be time consuming but it’s important to do so in order to start with a clean slate when laying down new materials such as carpet or tile during your renovations. Finally, inspect and repair subfloor as necessary before starting construction projects such as laying down new flooring or putting up walls within your home. Subfloors are typically made up of ply.
Gather Materials
Gathering materials for a woodworking project is essential to ensure it is completed properly and efficiently. With the right supplies, you can make sure that your project turns out just as good as you envisioned.
When purchasing hardwood boards, it’s important to consider the type of wood used and its quality. Different types of wood will require different tools and techniques when working with them. If in doubt, ask an experienced worker at the lumber store for advice on which type would be best suited for your project.
In addition to hardwoods, other materials are necessary to complete a woodworking project such as nails, adhesive, wood filler, sandpaper and sealant. The size of nails you need will depend on the size of boards being fixed together while adhesive will help keep them firmly attached if needed. Wood filler can be used if any areas need filling in after sawing or cutting while sandpaper can be used to smooth down surfaces before applying sealant which helps protect against water damage or warping from changing temperatures or humidity levels over time.
Install Underlayment
If you’re looking to add a little extra comfort and insulation to your flooring, then you should consider installing underlayment. Underlayment provides a cushion for your feet and helps to keep the temperature in the room more consistent. It also serves as a barrier between the subfloor and your finished flooring, protecting it from moisture damage. Here’s what you need to know about installing underlayment on your own.
First, measure the room carefully so that you can determine exactly how much underlayment material is needed for the job. You will want enough material to cover each wall in the room completely with some left over for trimming around door frames and other objects that may be sticking out of the walls.
Once you have gathered all of your materials, cut each piece of underlayment according to its measurements using either scissors or a utility knife (or both). Be sure not to cut too large or too small so that everything fits together nicely once it is laid out on the floor. When it is time to apply adhesive, make sure that you use one specifically designed for use with underlayment materials since other types may not hold up as well over time.
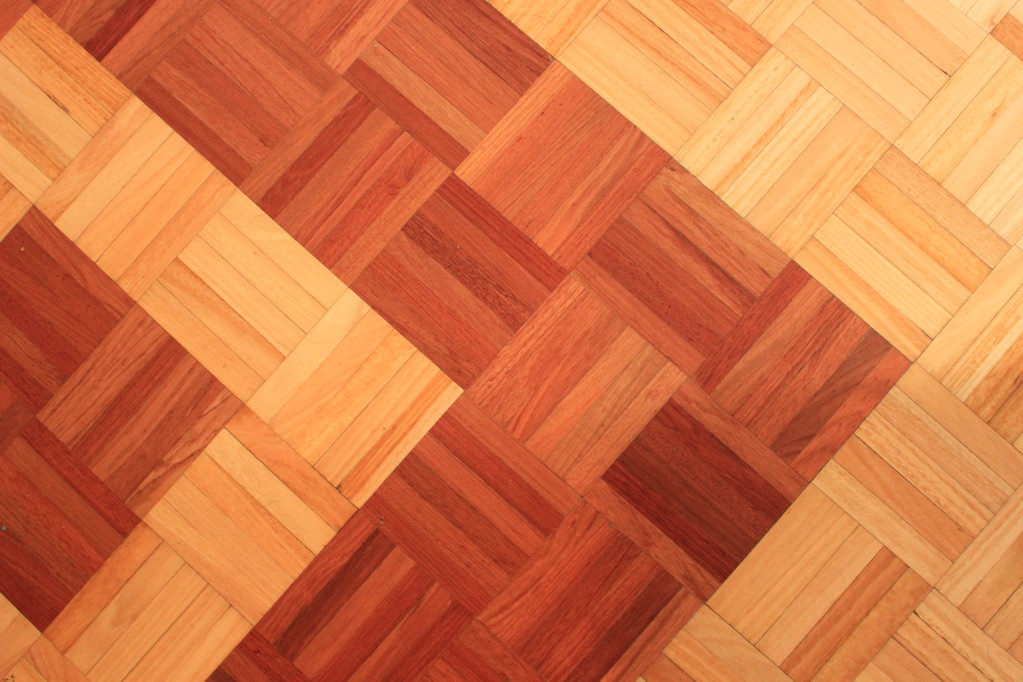
Layout Hardwood Boards
Installing Hardwood Flooring is a great way to add value and beauty to your home. With the right tools, materials and knowledge, laying hardwood boards can be an enjoyable project that will have you admiring your new floor for many years to come.
To start the process of laying hardwood boards, it’s important to determine where you want to begin in the room. Once this decision is made, place the first board with its tongue side facing towards the wall. Then snap together successive boards with their groove side against the tongue side of previous board. In order to ensure a consistent gap between each board, use spacers between them as you lay them down in succession across the room.
Continue until all boards for entire room are down and then cut around walls or other obstacles as necessary with a saw or jigsaw . To finish off your beautiful new flooring , consider adding shoe molding along edges of wall or baseboard trim around perimeter of room .
Laying hardwood flooring can be an easy and rewarding DIY project if done properly . Taking care during installation will ensure your newly installed floors look great now and well into future years .
Secure Hardwood Boards:
Hardwood boards have become increasingly popular in construction projects, due to their beauty, durability, and sustainability. With all the benefits that hardwood boards offer, it’s no wonder why they are so popular. However, there is one major issue with using hardwood boards: security. Hardwood boards can be easily damaged or broken if not properly secured. This can lead to costly repairs and even worse – an unsafe construction project.
Fortunately, there are several methods of securing hardwood boards that will ensure they remain safe and secure throughout the entirety of a project. The first step is to make sure the wood is properly sealed before it is installed on the structure being built; this includes both sides of each board as well as any knots which are present in the wood itself. Once this has been done, it’s time to install a secure fastener system such as screws or nails into each board; this will help keep them securely attached to whatever surface they are being used on while also preventing any damage from occurring due to movement over time.
Another way of ensuring your hardwood boards remain secure is by using special adhesives designed specifically for use with these materials; these adhesives will help keep your boards firmly attached without damaging them or weakening their integrity over time.
